Notifier catalog
mqttwarn supports a number of notification services. This list enumerates them alphabetically sorted.
alexa-notify-me
The alexa-notify-me service implements a gateway to make Alexa notifications using the Notify-Me voice app.
https://www.thomptronics.com/about/notify-me
[config:alexa-notify-me]
targets = {
	'account1' : [ 'Access Code' ]
  }

[alexa/notify]
targets = alexa-notify-me:account1
The access code is emailed to the user upon setup of Notify-Me.
Also see examples for Amazon Alexa.
amqp
The amqp service basically implements an MQTT to AMQP gateway which is a little bit
overkill as, say, RabbitMQ already has a pretty versatile MQTT plugin. The that as it
may, the configuration is as follows:
[config:amqp]
uri     =  'amqp://user:password@localhost:5672/'
targets = {
    'test01'     : [ 'name_of_exchange',    'routing_key' ],
    }
The exchange specified in the target configuration must exist prior to using this target.
Requires: Puka (pip install puka)
apns
The apns service interacts with the Apple Push Notification Service (APNS) and
is a bit special, and one of mqttwarn’s more complex services. It requires an
X.509 certificate and a key, which are typically available to developers only.
The following discussion assumes one of these payloads published via MQTT:
{"alert": "Vehicle moved" }
{"alert": "Vehicle moved", "custom" : { "tid": "C2" }}
In both cases, the message “Vehicle moved” will be displayed in the notification of the iOS device. The second example depends on the app which receives the notification. This custom data is per-app. This example app uses the custom data to show a button:

This is the configuration we’ll discuss.
[defaults]
hostname  = 'localhost'
port      = 1883
functions = 'myfuncs'

launch	 = apns

[config:apns]
targets = {
                 # path to cert in PEM format   # key in PEM format
    'prod'     : ['/path/to/prod.crt',          '/path/to/prod.key'],
    }

[test/token/+]
targets = apns
alldata = apnsdata()
format  = {alert}
Certificate and key files are in PEM format, and the key file must not be password-protected.
If you need to extract them from a PKCS#12 file, run:
openssl pkcs12 -in apns-CTRL.p12 -nocerts -nodes | openssl rsa > prod.key
openssl pkcs12 -in apns-CTRL.p12 -clcerts -nokeys > xxxx
Then, copy/paste from xxxx the sandbox or production certificate into prod.crt.
The myfuncs function apnsdata() extracts the last part of the topic into
apns_token, the hex token for the target device, which is required within the
apns service.
def apnsdata(topic, data, srv=None):
    return dict(apns_token = topic.split('/')[-1])
Publishing to topic test/token/380757b117f15a46dff2bd0be1d57929c34124dacb28d346dedb14d3464325e5
will emit the APNS notification to the specified device.
This module depends on the Python apns package.
apprise_about
The apprise_single and apprise_multi service plugins interact with the
Apprise Python library, which in turn can talk to a plethora of popular
notification services:
Apprise API, AWS SES, AWS SNS, Bark, BulkSMS, Boxcar, ClickSend, DAPNET, DingTalk, Discord, E-Mail, Emby, Faast, FCM, Flock, Gitter, Google Chat, Gotify, Growl, Guilded, Home Assistant, IFTTT, Join, Kavenegar, Kodi, Kumulos, LaMetric, Line, MacOSX, Mailgun, Mattermost, Matrix, Microsoft Windows, Mastodon, Microsoft Teams, MessageBird, MQTT, MSG91, MyAndroid, Nexmo, Nextcloud, NextcloudTalk, Notica, Notifico, ntfy, Office365, OneSignal, Opsgenie, PagerDuty, ParsePlatform, PopcornNotify, Prowl, PushBullet, Pushjet, Pushover, Pushsafer, Reddit, Rocket.Chat, SendGrid, ServerChan, Signal, SimplePush, Sinch, Slack, SMSEagle, SMTP2Go, Spontit, SparkPost, Super Toasty, Streamlabs, Stride, Syslog, Techulus Push, Telegram, Twilio, Twitter, Twist, XBMC, Vonage, Webex Teams.
Apprise Notification Services has a complete list and documentation of the 80+ notification services supported by Apprise.
Notification services are addressed by URL, see Apprise URL Basics. Please consult the Apprise documentation about more details.
Apprise notification plugins obtain different kinds of configuration or
template arguments. mqttwarn supports propagating them from either the
baseuri configuration setting, or from its data dictionary to the Apprise
plugin invocation.
So, for example, you can propagate parameters to the Apprise JSON HTTP POST Notifications plugin by either pre-setting them as URL query parameters, like
json://localhost/?:sound=oceanwave
or by submitting them within a JSON-formatted MQTT message, like
{":sound": "oceanwave", "tags": "foo,bar", "click": "https://httpbin.org/headers"}
apprise_single
This variant can publish messages to a single Apprise plugin by URL.
The following configuration snippet example expects a payload like this to be published to the MQTT broker:
echo '{"device": "foobar", "name": "temperature", "number": 42.42}' | mosquitto_pub -t 'apprise/single/foo' -l
This is an example configuration snippet to submit notifications using Apprise to E-Mail, an HTTP endpoint, and a Discord channel.
[defaults]
launch    = apprise-mail, apprise-json, apprise-discord

[config:apprise-mail]
; Dispatch message as e-mail.
; https://github.com/caronc/apprise/wiki/Notify_email
module   = 'apprise_single'
baseuri  = 'mailtos://smtp_username:smtp_password@mail.example.org'
sender   = 'monitoring@example.org'
sender_name = 'Example Monitoring'
targets  = {
    'demo' : ['foo@example.org', 'bar@example.org'],
    }

[config:apprise-json]
; Dispatch message to HTTP endpoint, in JSON format.
; https://github.com/caronc/apprise/wiki/Notify_Custom_JSON
module   = 'apprise_single'
baseuri  = 'json://localhost:1234/mqtthook'

[config:apprise-discord]
; Dispatch message to Discord channel, via Webhook.
; https://github.com/caronc/apprise/wiki/Notify_discord
; https://discord.com/developers/docs/resources/webhook
; discord://{WebhookID}/{WebhookToken}/
module   = 'apprise_single'
baseuri  = 'discord://4174216298/JHMHI8qBe7bk2ZwO5U711o3dV_js'

[apprise-single-test]
topic    = apprise/single/#
targets  = apprise-mail:demo, apprise-json, apprise-discord
format   = Alarm from {device}: {payload}
title    = Alarm from {device}
In order to mention people within messages to Discord, you will need to use
their numerical user identifiers like mosquitto_pub -m "hello <@user_id> again".
This is not their text username. A special case is mentioning everyone in a
channel, which works like -m "hello @everyone again".
apprise_multi
The idea behind this variant is to publish messages to different Apprise plugins within a single configuration snippet, containing multiple recipients at different notification services.
The following configuration snippet example expects a payload like this to be published to the MQTT broker:
echo '{"device": "foobar", "name": "temperature", "number": 42.42}' | mosquitto_pub -t 'apprise/multi/foo' -l
[defaults]
launch    = apprise-multi

[config:apprise-multi]
; Dispatch message to multiple Apprise plugins.
module   = 'apprise_multi'
targets = {
   'demo-http'        : [ { 'baseuri':  'json://localhost:1234/mqtthook' }, { 'baseuri':  'json://daq.example.org:5555/foobar' } ],
   'demo-discord'     : [ { 'baseuri':  'discord://4174216298/JHMHI8qBe7bk2ZwO5U711o3dV_js' } ],
   'demo-mailto'      : [ {
          'baseuri':  'mailtos://smtp_username:smtp_password@mail.example.org',
          'recipients': ['foo@example.org', 'bar@example.org'],
          'sender': 'monitoring@example.org',
          'sender_name': 'Example Monitoring',
          } ],
   }

[apprise-multi-test]
topic    = apprise/multi/#
targets  = apprise-multi:demo-http, apprise-multi:demo-discord, apprise-multi:demo-mailto
format   = Alarm from {device}: {payload}
title    = Alarm from {device}
asterisk
The asterisk service will make a VOIP conference between the number and the extension
(in defined context). Also, it sends the message as variable to the extension, so you can
‘speak’ to it. Configuration is similar as with the FreeSWITCH service,
but this service uses the Asterisk Manager Interface (AMI).
The plugin author strongly recommends you use AMI only in trusted networks.
[config:asterisk]
host     = 'localhost'
port     = 5038
username = 'mqttwarn'
password = '<AMI password>'
extension = 2222
context = 'default'
targets  = {
    'user'    : ['SIP/avaya/', '0123456789']
          }
Requires
Asterisk with configured AMI interface (manager.conf)
pyst2 - powerful Python abstraction of the various Asterisk APIs (pip install pyst2)
autoremote
The autoremote service forwards messages from desired topics to autoremote clients.
[config:autoremote]
targets = {
    'conv2' : [ 'ApiKey', 'Password', 'Target', 'Group', 'TTL' ]
  }

[autoremote/user]
targets = autoremote:conv2
Any messages published to autoremote/user would be sent the autoremote client designated to the ApiKey provided. The “sender” variable of autoremote is equal to the topic address.
azure_iot
This service is for Microsoft Azure IoT Hub.
The configuration requires the name of the IoT Hub, optionally a QoS level (default 0), and one or more targets. Each target defines which device to impersonate when sending the message.
[config:azure_iot]
iothubname = 'MyIoTHub'
qos = 1
targets = {
               # device id   # sas token
    'test' : [ 'mqttwarn',   'SharedAccessSignature sr=...' ]
  }
Message delivery is performed using the MQTT protocol, observing the Azure IoT Hub requirements.
carbon
A Carbon daemon, as part of a Graphite system, listens on the network for
time-series data. The carbon service sends a metric to a Carbon-enabled server
over TCP, using one of the Carbon protocols.
[config:carbon]
targets = {
        'c1' : [ '172.16.153.110', 2003 ],
  }

[c/#]
targets = carbon:c1
In this configuration, all messages published to c/# would be forwarded to
the Carbon server at the specified IP address and TCP port number.
The topic name is translated into a Carbon metric name by replacing slashes by periods. A timestamp is appended to the message automatically.
For example, publishing this:
mosquitto_pub -t c/temp/arduino -m 12
would result in the value 12 being used as the value for the Carbon metric
c.temp.arduino. The published payload may contain up to three parts separated
by white-space.
The carbon metric name, dot-separated (e.g.
room.temperature) If this is omitted, the MQTT topic name will be used as described above.The integer value for the metric.
An integer timestamp (UNIX epoch time), which defaults to “now”.
In other words, the following payloads are valid:
15                          just the value (metric name will be MQTT topic)
room.living 15              metric name and value
room.living 15 1405014635   metric name, value, and timestamp
celery
Celery is a simple, flexible, and reliable distributed system to process vast amounts of messages, while providing operations with the tools required to maintain such a system. It’s a task queue with focus on real-time processing, while also supporting task scheduling.
The celery service sends messages to celery which celery workers can consume.
[config:celery]
broker_url = 'redis://localhost:6379/5'
app_name = 'celery'
celery_serializer = 'json'
targets = {
   'hello': [
      {
        'task': 'myapp.hello',
        'message_format': 'json'
        }
      ],
  }

[hello/#]
targets = celery:hello
Broker URL can be any broker supported by celery. Celery serializer is usually json or pickle. Json is recommended for security. Targets are selected by task name. Message_format can be either “json” or “text”. If it is json, the message will be sent as a json payload rather than a string. In this configuration, all messages that match hello/ will be sent to the celery task “myapp.hello”. The first argument of the celery task will be the message from mqtt.
chromecast
The chromecast service sends messages via Text To Speach (TTS) to Chromecast devices, including Google Home Speakers.
# Don't fogert to set launch = ..., chromecast
[config:chromecast]
; Chromecast devices, including Google Home Speakers
#baseuri  = 'http://my.personal.server:5000/translate_tts?srttss_mimetype=audio/wav&'
#mimetype = 'audio/wav'
targets  = {
    'speaker' : ['Living Room'],
    }

# Command line test
# mqttwarn --plugin=chromecast --options='{"message": "Hello world", "addrs": ["Living Room"]}'
# echo 'Hello world' | mosquitto_pub -t 'chromecast/say' -l
# echo '{"message": "Hello world", "addrs": ["Living Room"]}' | mosquitto_pub -t 'chromecast/say' -l
[chromecast/say]
targets = chromecast:speaker
Address targets are the registered device friendly name. In this example, “Living Room”. The TTS server defaults to Google translate (and English). A custom server URL can be used for local TTS assuming the server honors Google Syntax arguments (for example https://github.com/clach04/srttss) via baseuri (and mimetype if the server does not server mp3 format files).
Requires pychromecast to be installed via::
pip install pychromecast
dbus
The dbus service sends a message over D-Bus to the user’s desktop.
So far, it has only been tested with Gnome3.
[config:dbus]
targets = {
    'warn' : [ 'Warning' ],
    'note' : [ 'Note' ]
    }
This module requires the Python dbus bindings.
desktopnotify
It invokes desktop notifications, using the desktop-notifier package.
[config:desktopnotify]
; title = Optional title; topic if not set
; sound = Default True [False] - Play sound?
targets = {
  'anything' : [ ],
  }
If the MQTT message is a JSON object, it will populate the notification title and message accordingly.
{
	"title" : "YourTitle",
	"message": "YourMessage"
}
dnsupdate
The dnsupdate service updates an authoritative DNS server via RFC 2136 DNS Updates.
Consider the following configuration:
[config:dnsupdate]
dns_nameserver = '127.0.0.2'
dns_keyname= 'mqttwarn-auth'
dns_keyblob= 'kQNwTJ ... evi2DqP5UA=='
targets = {
   #target             DNS-Zone      DNS domain              TTL   type
   'temp'         :  [ 'foo.aa.',     'temperature.foo.aa.', 300, 'TXT'   ],
   'addr'         :  [ 'foo.aa.',     'www.foo.aa.',         60,  'A'   ],
  }

[test/temp]
targets = log:info, dnsupdate:temp
format = Current temperature: {payload}C

[test/a]
targets = log:info, dnsupdate:addr
format = {payload}
dns_nameserveris the address of the authoritative server the update should be sent to, using a TCP update.dns_keynameanddns_keyblobare the TSIG key names and base64-representation of the key respectively. These can be created with either of those commands:ldns-keygen -a hmac-sha256 -b 256 keyname dnssec-keygen -n HOST -a HMAC-SHA256 -b 256 keyname
Here,
keynameis the name then added todns_keyname(in this example:mqttwarn-auth).
Supposing a BIND DNS server was configured to allow updates, you would then configure it as follows:
key "mqttwarn-auth" {
  algorithm hmac-sha256;
  secret "kQNwTJ ... evi2DqP5UA==";
};

...
zone "foo.aa" in {
   type master;
   file "keytest/foo.aa";
   update-policy {
      grant mqttwarn-auth. zonesub ANY;
   };
};
For the test/temp topic, a pub and the resulting DNS query:
$ mosquitto_pub -t test/temp -m 42'
$ dig @127.0.0.2 +noall +answer temperature.foo.aa txt
temperature.foo.aa. 300 IN  TXT "Current temperature: 42C"
The test/a topic expects an address:
$ mosquitto_pub -t test/a -m 172.16.153.44
$ dig @127.0.0.2 +short www.foo.aa
172.16.153.44
Ensure you watch both mqttwarn’s logfile and the log of your authoritative name server, in order to follow what is going on.
client 127.0.0.2#52786/key mqttwarn-auth: view internal: updating zone 'foo.aa/IN': adding an RR at 'www.foo.aa' A 172.16.153.44
This module is based on the dnspython package.
emoncms
The emoncms service sends a numerical payload to an EmonCMS instance.
EmonCMS is a powerful open-source application for processing, logging and
visualising energy, temperature and other environmental data.
The application can be deployed on your premises, or you can upload your readings to their server for viewing and monitoring within the scope of your account.
By specifying the node id and input name in the mqttwarn target, you can split different feeds into different nodes, and give each one a human-readable name, in order to identify them in EmonCMS.
[config:emoncms]
# URL of EmonCMS server.
url     = "https://emoncms.example.org/emoncms"
# API key generated by the EmonCMS server.
apikey  = ""
timeout = 5
targets = {
    'usage'  : [ 1, 'usage' ],  # [ <nodeid>, <name> ]
    'solar'  : [ 1, 'solar' ]
    }
execute
The execute target launches the specified program and its arguments. It is similar
to pipe but it doesn’t open a pipe to the program.
Example use cases are, for example, IoT buttons, which publish a message when they are pushed, in order to execute an external program. It is also a light version of mqtt-launcher.
[config:execute]
targets = {
             # argv0 .....
   'touch' : [ 'touch', '/tmp/executed' ],
   'cat'   : [ 'cat', '[TEXT]' ]
   }
To pass the published data (text) to the command, use [TEXT] which then gets replaced.
This can also be configured with the text_replace parameter.
Note, that for each message targeted to the execute service, a new process is
spawned (fork/exec), so it is quite “expensive”.
See also
A real-world example how this feature can be used is demonstrated at Simple MQTT media player.
fbchat
Notification of one Facebook account requires an account. For now, this is only done for messaging from one account to another.
Upon configuring this service’s targets, make sure the three (3) elements of the list are in the order specified!
[config:fbchat]
targets = {
  'janejol'   :  [ 'vvvvvvvvvvvvvvvvvvvvvv',                              # username sending message
                   'wwwwwwwwwwwwwwwwwwwwwwwwwwwwwwwwwwwwwwwwww',          # username's password (sending message)
                   'xxxxxxxxxxxxxxxxxxxxxxxxxxxxxxxxxxxxxxxxxxxxxxxxxx'  # destination account (receiving message)
                  ]
   }
Requires:
A Facebook account
file
The file service can be used for logging incoming topics, archiving, etc.
Each message is written to a path specified in the target address descriptor,
as a list. Note that by default, files are opened for appending, and then
closed on each notification.
Supposing we wish to archive all messages received on the MQTT topic arch/#
to a file /data/arch, we could configure the following:
[config:file]
append_newline = True
overwrite = False
targets = {
    'log-me'    : ['/data/arch']
   }
Options
If append_newline is True, a newline character is unconditionally appended
to the string written to the file.
If overwrite is True, the file is opened for truncation upon writing, i.e.
the file will contain the last message only.
Both parameters can also be specified on a per-file basis, where per-item parameters take precedence over global parameters. In order to do that, the corresponding configuration snippet would look like this:
[config:file]
targets = {
    'log-me'    : {'path': '/data/arch', 'append_newline': True, 'overwrite': False},
   }
Although the decode_utf8 service option acts on a different spot, it makes
sense to outline how to forward and store MQTT message payloads to files 1:1.
It also works on binary files, for example images.
[config:file]
targets        = {
    'store-me': ['./var/media/spool.jpg'],
    }

# Pass-through payload content 1:1.
append_newline = False
decode_utf8    = False
overwrite      = True
freeswitch
The freeswitch service will make a VOIP call to the number specified in your
target, using FreeSWITCH, and ‘speak’ the message using the TTS service you
specify.
Each target includes the gateway to use, as well as the number/extension to call, so you can make internal calls directly to an extension, or call any external number using your external gateway.
In order to use this service, you will need to enable the FreeSWITCH XML RPC API.
You need to provide a TTS URL to perform the text-to-speech conversion of your message to an announcement. This can be an online service like VoiceRSS, the Google Translate API, or another local TTS service you are using.
[config:freeswitch]
host      = 'localhost'
port      = 8050
username  = 'freeswitch'
password  = '<xml_rpc_password>'
ttsurl    = 'translate.google.com/translate_tts?'
ttsparams = { 'tl': 'en', 'ie': 'UTF-8', 'client': 'mqttwarn', 'q': '{payload}' }
targets   = {
    'mobile'    : ['sofia/gateway/domain/', '0123456789']
    }
This module requires:
Internet connection for Google Translate API
Note
Only the first 100 chars of the message will be announced, because this is the maximum length supported by the Google Translate API.
gss2
The gss2 service interacts directly with a Google Docs Spreadsheet. Each message
can be written to a row in a selected worksheet.
Each target has two parameters.
The spreadsheet URL. You can copy the URL from your browser that shows the spreadsheet.
The name of the worksheet. Try
Sheet1.
[config:gss2]
client_secrets_filename = client_secrets.json
oauth2_code =
oauth2_storage_filename = oauth2.store
targets = {
    # spreadsheet_url                                          # worksheet_name
    'test': [ 'https://docs.google.com/spre...cdA-ik8uk/edit', 'Sheet1']
    # This target would be addressed as 'gss2:test'.
    }
Note
It is important that the top row into your blank spreadsheet has column headings that correspond to the values that represent your dictionary keys. If these column headers are not available, or different from the dictionary keys, the new rows will be empty.
Note
A Google Spreadsheet initially contains 100 or 1,000 empty rows. New rows added by
gss2 will be below, so you might want to delete those empty rows.
This module requires:
google-api-python-client (
pip install google-api-python-client)gspread (
pip install gspread)
Setup OAuth2 with Google
gss2 uses OAuth 2.0 authentication, please read the setup procedure documentation
carefully. Here is an overview how the authentication with Google works:
You obtain a
client_secrets.jsonfile from Google Developers Console.You reference that file in the
client_secrets_filenamefield and restart mqttwarn.You grab an URL from the logs and visit that in your web browser.
You copy the resulting code to
mqttwarn.ini, fieldoauth2_codeand restart mqttwarn.gss2stores the eventual credentials in the file you specified in fieldoauth2_storage_filename.Everyone lives happily ever after. I hope you reach this point without severe technology burnout.
Technically, you could remove the code from field
oauth2_code, but it does not harm to leave it there.
Now to the details of this process:
The contents of the file client_secrets_filename needs to be obtained by you as described
in the Google API Client Library for Python Docs on OAuth 2.0 for an Installed Application.
Unfortunately, Google prohibits developers
to publish their credentials as part of open source software. So you need to get the
credentials yourself.
To get them:
Log in to the Google Developers website from here.
Follow the instructions in section
Creating application credentialsfrom the OAuth 2.0 for Installed Applications chapter. You are looking for anOAuth client ID.In the Credentials screen of the API manager there is a download icon next to your new client ID. The downloaded file should be named something like
client_secret_664...json.Store that file near e.g.
mqttwarn.iniand ensure the settingclient_secrets_filenamehas the valid path name of it.
Then, you start with the gss2 service enabled and with the client_secrets_filename
readable. Once an event is to be published, you will find an error in the logs with a
URL that you need to visit with a web browser that is logged into your Google account.
Google will offer you to accept access to Google Docs/Drive. Once you accept, you get
to copy a code that you need to paste into field oauth2_code and restart mqttwarn.
The file defined in oauth2_storage_filename needs to be missing or writable and will
be created or overwritten. Once OAuth credentials have been established (using the
oauth2_code), they are persisted in there.
Example
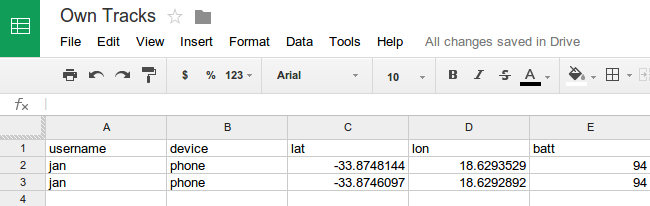
An [OwnTracks] MQTT message like
mosquitto_pub -t nn/ohoh -m '{"username": "jan", "device":"phone", "lat": "-33.8746097", "lon": "18.6292892", "batt": "94"}'
will turn into:
hangbot
The hangbot service allows messages to be forwarded to a Google Hangouts account using hangoutsbot api plugin. https://github.com/hangoutsbot/hangoutsbot/wiki/API-Plugin
[config:hangbot]
targets = {
		 #URL		 #PORT	 #ApiKey	#Conversation ID
   'conv1'   : ['ServerAddress', 'Port', 'xxxxxxxxxxx', 'xxxxxxxxxxxxxxxxxxxx']
  }
http
The http service allows to invoke GET and POST requests to an HTTP service.
Each target has five parameters.
The HTTP method, one of
getorpost.The URL, which is transformed if possible, while ignoring any transformation errors.
Noneor a dict of parameters. Each individual parameter value is transformed.Noneor a list of username/password tuples e.g.( 'username', 'password')NoneorTrue, to force the transformation of the third parameter to a JSON object, and to send the HTTP headerContent-Typewith a value ofapplication/json, when usingpost.
[config:http]
timeout = 60

targets = {
                #method     #URL               # query params or None                              # list auth # Json
  'get1'    : [ "get",  "http://example.org?", { 'q': '{name}', 'isod' : '{_dtiso}', 'xx': 'yy' }, ('username', 'password') ],
  'post1'    : [ "post", "http://example.net", { 'q': '{name}', 'isod' : '{_dtiso}', 'xx': 'yy' }, None, True ]
  }
If you want to use the MQTT message content in the query parameters verbatim,
use '{payload}'.
Note
Note that transforms in parameters must be quoted strings:
Wrong:
'q' : {name}Correct:
'q' : '{name}'
As a special case, if the quoted parameter starts with an @ character (e.g.
'@name'), it will not be formatted via .format(). Instead, name is taken
directly from the transformation data.
icinga2
This service is for the REST API in Icinga2. Icinga2 is an open source monitoring system. Using this service, JSON payloads can be sent to your Icinga2 server to indicate host/service states or passive check updates.
By default, the service will POST a process-check-result to your Icinga2
server with the following payload.
payload  = {
    'service'       : 'host-name!service-name',
    'check_source'  : 'check-source',
    'exit_status'   : priority,
    'plugin_output' : message
    }
Where the host-name, service-name and check-source come from the service
config (see below), the priority is the standard mqttwarn priority, either
hard coded or derived via a function, and the message is the payload arriving
at the MQTT topic.
NOTE: if service-name is None in the target config the payload will include
'host' : 'host-name' instead of the 'service' entry, and can be used for
host checks.
However, it is possible to create your own payload by adding a custom format function where you can specify a dict of key/value pairs and these will be used to update the payload sent to Icinga2.
For example, we can add a custom function.
def icinga2_format(data, srv):
    icinga2_payload = {
        'exit_status'  : 0,
        'plugin_output': "OK: my-service is publishing",
        'service'      : "host.com!my-service",
        }

    return json.dumps(icinga2_payload)
This allows you to manipulate the status, output and service name by parsing topic names and message payloads.
[config:icinga2]
host     = 'https://icingahost'
port     = 5665
username = 'api-username'
password = 'api-password'
cacert   = '<path-to-ca-cert>'
targets  = {
                        # host-name   service-name  check-source
    'host-check '    : [ 'host.com',  None,         'mqttwarn' ],
    'service-check ' : [ 'host.com',  'passive',    'mqttwarn' ],
    }
NOTE: cacert is optional but since icinga2 is typically installed with a
self-signed certificate specifying the icinga2 ca-cert will stop a load of
TLS certificate warnings when connecting to the REST API.
ifttt
This service is for IFTTT Webhooks integrations to send the message as a payload in value1. For example, to get notifications on your mobile devices.
[config:ifttt]
targets = {
    'warnme'   : [ '<api key>', '<event webhook>' ]
  }
ionic
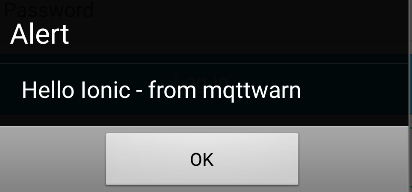
This service is for Ionic. Ionic framework allows easy development of HTML5 hybrid mobile apps. This service can be used for pushing notifications to ionic hybrid apps (Android, iOS, …). Please read following for more details on Ionic: Ionic documentation and Ionic Push Notifications API.
You will get Ionic appid and Ionic appsecret (private key) after registering with Ionic push service. And you will get device token(s) when app initiates push service interaction.
Using this service, plain texts can be sent to one or many ionic apps. Each app can in turn push to many devices.
Example
[config:ionic]
targets = {
  'anyappalias' : [ '<ionic app id>', '<ionic app secret>', '<device token 1>', '<device token 2>', '<device token N>']
  }
influxdb
This service provides a way for forwarding data to the time series database InfluxDB.
You will need to install an instance of InfluxDB and create a new user. Then, create a new database and give your user write permissions to that database.
You can then setup multiple targets, each of which is a different measurement in your InfluxDB database. Individual targets can override the default measurement, retention policy, and/or precision.
Each time a value is received for an InfluxDB target, the value is sent to the configured measurement with a topic tag matching the MQTT topic the data arrived at.
The topic name is normalised by replacing / with _. So, a value arriving on
sensor/kitchen/temperature would be published to InfluxDB with a tag of
topic=sensor_kitchen_temperature.
This allows you to set up measurements with multiple time series streams, or have a separate measurement for each stream.
Following is an ini example, showing the various connection properties for the
InfluxDB database, and some example target address descriptor configurations.
The retention policy (rp) and precision settings are optional, the default
InfluxDB retention policy (autogen) and precision (ns [nanosecond]) will be
used if not specified.
[config:influxdb]
# Protocol for connection to InfluxDB: http or https. Default: http
scheme    = 'https'
host      = 'influxdbhost'
port      = 8086

username  = 'username'
password  = 'password'
database  = 'mqttwarn'
# Retention Policy: optional (default: autogen)
rp        = 'retentionpolicy'
# Precision: optional (default: ns)
precision = 's'    # { ns, u, ms, s, m, h }
targets = {
                          # measurement
    'humidity'         : [ 'humidity' ],
    'temperature'      : [ 'temperature' ]
    }
Individual targets can override the default measurement, retention policy, and/or precision:
[config:influxdb]
host      = 'influxdbhost'
port      = 8086
username  = 'username'
password  = 'password'
database  = 'mqttwarn'
rp        = 'retentionpolicy'
precision = 'ns'    # { ns, u, ms, s, m, h }
targets = {
                       # measurement (use database, rp, and precision specified above)
    'temperature'   : [ 'temperature' ],
                       # measurement,    database,   rp,     precision
    'disk'          : [ 'disk',          'servers',  'rp',   'h' ]
                       # measurement,    database   (default rp & precision)
    'cpu'           : [ 'cpu',           'servers' ],
                       # use default rp, but override database & precision:
    'alpha'         : [ 'alpha',         'metrics',  '',    's' ]
    }
InfluxDB tags and fields can be specified per topic using transformations. The format string should not contain quotes, and should follow these examples.
Note
The tag set (if any) should be listed first, comma-separated and without spaces, followed by whitespace and then the field set (required, if format is used).
[topic/one]
format = tagkey1=tagvalue1,tagkey2=tagvalue2  field=value
[topic/two]
format = field=value
The ‘topic’ tag is always set as described above.
Messages received matching the following config…
[environment/temperature/basement]
targets = influxdb:temperature
format = room=basement,entity=sensor2 temperature={payload}
… will be stored as:
             (tag)    (tag)     (field)      (tag)
time         entity   room      temperature  topic
----         ------   ----      -----------  -----
{timestamp}  sensor2  basement  47.5         environment_temperature_basement
Attention
This module will currently only work with InfluxDB 1.x. In order to make the leap to InfluxDB 2.x, contributions to Support for InfluxDB 2 #563 are very much welcome.
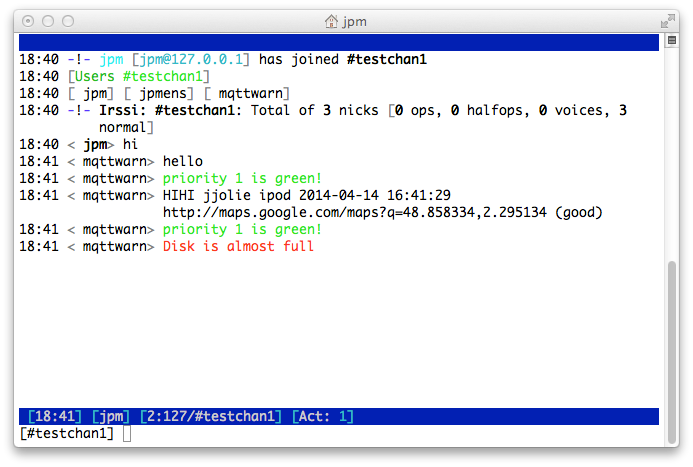
irccat
The irccat target fires a message off to a listening IRCcat IRC bot, which is
a member on one or more IRC channels.
Each target has to be configured with the IP address, TCP port, and channel name, of the particular IRCcat instance it should target.
[config:irccat]
targets = {
             # address     port   channel
   'chan1': [ '127.0.0.1', 12345, '#testchan1' ],
  }
Topic option |
M/O |
Description |
|---|---|---|
|
O |
Colour: 0=black, 1=green, 2=red |
The priority field can be used to indicate a message colour.
linuxnotify
The linuxnotify service is used to display notifications on a running desktop
environment (only tested with Gnome3).
[config:linuxnotify]
targets = {
    'warn' : [ 'Warning' ]
    }

This module requires:
Gnome3 as desktop environment
gobject-introspectionPython bindings
log
The log service allows you to forward messages to the logging system of mqttwarn.
In turn, messages directed at log will land in mqttwarn’s log file.
[config:log]
targets = {
    'info'   : [ 'info' ],
    'warn'   : [ 'warn' ],
    'crit'   : [ 'crit' ],
    'error'  : [ 'error' ]
  }
mattermost
The mattermost service sends messages to a private Mattermost instance using incoming Webhooks.
Consider the following configuration:
hook_urlis the URL of the incoming Webhookchannelis the name of the channelusername(can be None) specifies the user name as which mqttwarn will post if the Mattermost administrator has allowed overrideicon_urlis the URL to an icon (can be None, and if not must be resolvable to Mattermost)
[config:mattermost]
targets = {
# hook_url, channel, username, icon_url
'jpt' : [ 'http://localhost:8065/hooks/s9x9x8xywjgw9x9x8xyqiujcyo',
'town-square',
'mqttwarn-jpt',
'http://192.168.1.130/~jpm/ninja.png' ],
'vehicles' : [ 'http://127.0.0.1:8065/hooks/a87x8we4wjgwfxmuh7j9x9x8xy',
'town-square',
'owntracks',
'http://example.org/owntracks.png' ],
}
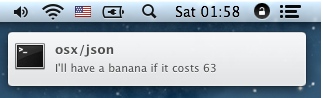
[osx/json]
targets = mattermost:jpt
format = I'll have a {fruit} if it costs {price}
[owntracks/+/+]
title = Owntracks position
targets = mattermost:vehicles
This will, with appropriate JSON payloads, produce the following posts in Mattermost.
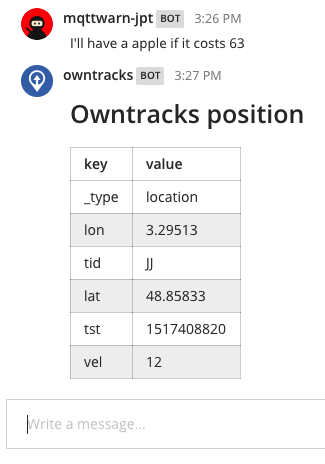
Note how this service attempts to format incoming JSON as a Markdown table.
mqtt
The mqtt service publishes outbound messages to MQTT topics on remote
MQTT brokers, effectively providing powerful [MQTT republishing], topic
rewriting, and bridging/routing capabilities.
See also
In order to publish a message to the same MQTT broker mqttwarn is connected to, the mqttpub module is the right choice.
Consider the following configuration snippets:
[config:mqtt]
hostname =  'localhost'
port =  1883
qos =  0
retain =  False
username =  "jane"
password =  "secret"
targets = {
  'o1'    : [ 'out/food' ],
  'o2'    : [ 'out/fruit/{fruit}' ],
  'm2'	  : [ 'sometopic', 'specialmq.ini' ],
  }

[in/a1]
targets = mqtt:o1, mqtt:o2
format =  'Since when does a {fruit} cost {price}?'
The topicmap instructs mqttwarn to subscribe to in/a1, and republish to two
MQTT targets. The second target (mqtt:o2) has a topic branch with a variable
in it which is to be interpolated ({fruit}).
These are the results for corresponding publishes:
$ mosquitto_pub -t 'in/a1' -m '{"fruit": "pineapple", "price": 131, "tst" : "1391779336"}'

in/a1 {"fruit": "pineapple", "price": 131, "tst" : "1391779336"}
out/food Since when does a pineapple cost 131?
out/fruit/pineapple Since when does a pineapple cost 131?


$ mosquitto_pub -t 'in/a1' -m 'temperature: 12'

in/a1 temperature: 12
out/food temperature: 12
out/fruit/{fruit} temperature: 12
In the first case, the JSON payload was decoded and the fruit variable could be
interpolated into the topic name of the outgoing publish, whereas the latter shows
the outgoing topic branch without interpolated values, because they simply didn’t
exist in the original incoming payload.
The optional second value in the topic map, specialmq.ini in the example above,
specifies the name of an INI-type file with parameters which override the basic
configuration of this service. Assume most of your MQTT targets go to localhost,
but you want one target to be configured to address a distinct MQTT broker. Create
an INI file with any name you desire and specify that as the optional second
parameter.
[defaults]
hostname= 10.0.12.1
port= 1884
client_id = blub01
qos = 1
retain = False

[auth]
username = jjolie
password = seecret

[tls]
ca_certs = foobar.crt
;certfile = xxx.crt
;keyfile = xxx.key
tls_version = tlsv1
;ciphers = xxxxx xx
This shows the currently full configuration possible. Global values from the
mqtt service override those not specified here. Also, if you don’t need
authentication using auth or tls, you may omit those sections. However,
the defaults section MUST exist.
Note
Currently, this module creates a new connection to the configured MQTT broker for each outbound message.
mqttpub
The mqttpub service publishes outbound messages to MQTT topics on the same
MQTT broker mqttwarn is connected to, effectively providing powerful [MQTT
republishing], topic rewriting, and bridging/routing capabilities.
In order to publish a message to a different MQTT broker, the mqtt module is the right choice.
Each target requires a topic name, the desired qos, and a retain flag.
[config:mqttpub]
targets = {
                # topic            qos     retain
    'mout1'   : [ 'mout/1',         0,     False ],
    'special' : [ 'some/{device}',  0,     False ],
  }
If the outgoing topic name contains transformation strings, e.g. out/some/{temp},
values are interpolated accordingly. Should this not be possible, e.g. because a
string is not available in the transformation data, the message is not published.
Note
This module does not incur the overhead of creating a new connection for each outbound message.
mqtt_filter
The mqtt_filter target executes the specified program and its arguments. It is similar
to pipe but it doesn’t open a pipe to the program. It provides stdout as response
to a configured queue.
Example use cases are e.g. IoT buttons which publish a message when they are pushed
and they execute an external program. It is also a clone of mqtt-launcher.
With no response configured it acts like execute with multiple arguments.
To pass the published data (json args array) to the command, use {args[0]} and {args[1]} which then gets replaced. Message looks like '{ "args" : ["' + temp + '","' + room + '"] }' for fr itzctl.
outgoing_topic is constructed by parts of incoming topic or as full_incoming topic.
[config:mqtt_filter]
targets = {
   # full_topic, topic[0], topic[1], args[0], .....
   # touch file /tmp/executed
   'touch'    : [ None,0,0,'touch', '/tmp/executed' ],
   # uses firtzctl to set temperature of a room
   'fritzctl' : [ None,0,0,'/usr/bin/fritzctl','--loglevel=ERROR','temperature', "{args[0]}", "{args[1]}" ]
   # performs a dirvish backup and writes stdout as a new messages to response topic
   'backup'   : ["response/{topic[1]}/{topic[2]}",0,0,'/usr/bin/sudo','/usr/sbin/dirvish','--vault', "{args[0]}" ],
   }
Use case for fritzctl is to change the requested temperature for a connected thermostat. Topic is constructed as /home/{room}/temperature/{action}.
def TemperatureConvert( data=None, srv=None):

    # optional debug logger
    if srv is not None:
        srv.logging.debug('data={data}, srv={srv}'.format(**locals()))

    topic = str( data.get('topic','') )

    # init
    room = ''
    action = 'status'

    # /home/{room}/temperature/{action}
    parts = topic.split('/')

    for idx, part in enumerate( parts ):
         if idx == 1:
             room = part

         if idx == 3:
             action = part

    temp = str( data.get('payload','sav') )
    if temp == '':
        temp = 'sav'

    if action == 'set':
        cmd = '{ "args" : ["' + temp + '","' + room + '"] }'

    return cmd
Use case for backup is to run a dirvish backup triggered by a simple mqtt message.
Note, that for each message targeted to the mqtt_filter service, a new process is
spawned (fork/exec), so it is quite “expensive”.
mysql
The MySQL plugin will attempt to add a row for every message received on a given topic, automatically filling in columns.
How does it work?
For instance, given a table created with
CREATE TABLE names (id INTEGER, name VARCHAR(25));
the message
{ "name" : "Jane Jolie", "id" : 90, "number" : 17 }
on topic my/2 will be added to the table like this:
+------+------------+
| id   | name       |
+------+------------+
|   90 | Jane Jolie |
+------+------------+
The values for the id and name columns are assumed to be filled by the values of
the JSON nodes with the same name.
If you added columns topic, payload and _dtiso to the database, then that same
message will add this row:
+------+------------+-----------------------------------------------------+-----------------------------+-------+
| id   | name       | payload                                             | _dtiso                      | topic |
+------+------------+-----------------------------------------------------+-----------------------------+-------+
|   90 | Jane Jolie | { "name" : "Jane Jolie", "id" : 90, "number" : 17 } | 2018-09-17T20:20:31.889002Z | my/2  |
+------+------------+-----------------------------------------------------+-----------------------------+-------+
Here, the plugin pulled values for the new columns from standard mqttwarn metadata.
When a message is received, the plugin will attempt to populate the following column names:
Root-level JSON fields in the message
e.g.
nameandidabove
Names for transformation data fields
e.g.
topic,payloadand_dtisoas abovenote that these all must be
VARCHARcolumns; timestamp columns are not yet supported
the fallbackcolumn, as noted below
To be clear, there is no other way to configure this particular plugin to use different
column names. If you need such a capability, e.g. you want to a column called receivedAt
to be filled with the timestamp, then you can use an alldata function to transform the
incoming message into a JSON document with the desired node names. Or, you can try the
mysql_remap plugin.
Setup
The MySQL plugin module is one of the most complicated to set up, please read this documentation section very carefully.
First, it requires the MySQLDb library to be installed, which is not trivial. On Debian Linux, it works like this:
sudo apt-get install -y python-dev libmysqlclient-dev
sudo pip install MySQL-python
It then requires the following configuration section:
[config:mysql]
host  =  'localhost'
port  =  3306
user  =  'jane'
pass  =  'secret'
dbname  =  'test'
targets = {
            # tablename  #fallbackcolumn ('NOP' to disable)
 'm2'   : [ 'names',     'full'            ]
  }
Finally, a topic section:
[names]
topic = my/#
targets = mysql:m2
The target contains a so-called fallbackcolumn, into which mqttwarn adds the
remainder of the payload for all columns not targeted with JSON data unless that
is explicitly configured as NOP in the service, in which case extra data gets
discarded.
So, let’s add the fallbackcolumn to the schema:
ALTER TABLE names ADD full TEXT;
Publishing the same payload again will insert this row into the table:
+------+------------+-----------------------------------------------------+
| id   | name       | full                                                |
+------+------------+-----------------------------------------------------+
|   90 | Jane Jolie | NULL                                                |
|   90 | Jane Jolie | { "name" : "Jane Jolie", "id" : 90, "number" : 17 } |
+------+------------+-----------------------------------------------------+
As you can imagine, if we add a number column to the table, it too will be
correctly populated with the value 17.
The payload of messages which do not contain valid JSON will be copied verbatim to the fallbackcolumn:
+------+------+-------------+--------+
| id   | name | full        | number |
+------+------+-------------+--------+
| NULL | NULL | I love MQTT |   NULL |
+------+------+-------------+--------+
You can add columns with the names of the built-in transformation types
(e.g. _dthhmmss) to have those values stored automatically.
mysql_dynamic
This service plugin is similar to the mysql plugin, but tables and columns
are created dynamically / on demand, as needed. The name of the table is derived from
the MQTT topic, replacing the dash separator with underscores. For example, receiving
data on the MQTT topic device/laptop/tracks will create a table named
device_laptop_tracks.
The message will be processed, and each JSON field will be stored in a dedicated column. The columns of each table, and the table itself, are created when the first message is received on the corresponding topic. The configuration allows you to ignore specific fields. Those will not be stored in the database.
As an example, by publishing this JSON payload,
mosquitto_pub -t my/2 -m '{"name": "Jane Jolie", "id": 90, "number": 17}'
… a table named my_2 will be created on the fly, with the following structure
and content. The table name is derived from the MQTT topic, and slashes are replaced by
underscores.
+------+------------+--------+--------------------------------------------------+
| id   | name       | number | payload                                          |
+------+------------+--------+--------------------------------------------------+
|   90 | Jane Jolie | 17     | '{"name": "Jane Jolie", "id": 90, "number": 17}' |
+------+------------+--------+--------------------------------------------------+
Note
By default, the information is always stored redundantly: Each field separately
within a dedicated column, and all fields together as received within the payload
column. If you can use the field ignore capability to disable this behaviour. Actually,
lots of other fields (created by mqttwarn) may be present. Adjust your configuration as
required.
Attention
Limitations: At this point, if the payload format or shape changes, the tables are not modified and data may fail to be stored. Also, there is no fallback table or column like the mysql plugin maintains.
Configuration
The module requires the following configuration to be present in the configuration file.
[config:mysql_dynamic]
host  =  'localhost'
port  =  3306
user  =  'dbusername'
pass  =  'dbpassword'
dbname  =  'database'
index   =  'index_table_name'

targets = {
        # target to use: [ list of fields to ignore and not store ]
        'target_name' : ['field1', 'field2','field3' ]
    }
Index table
An index table, containing a timestamp and the name of the topic, will keep track of
the latest update to the remaining tables. The name of the index table can be specified
in the configuration, and must be created manually. The following statements create an
index table named index_table_name.
CREATE TABLE `index_table_name` (
  `topic` text NOT NULL,
  `ts` timestamp NOT NULL DEFAULT CURRENT_TIMESTAMP ON UPDATE CURRENT_TIMESTAMP,
  PRIMARY KEY `topic` (`topic`(128))
);
Requirements
mysql_remap
This service was originally designed to transform and store SonOff telemetry messages into a MySQL database, where database doen’t need to have columns with same name as values in the MQTT messages.
My new service (called mysql_remap) inserts new record into MySQL. This is a generic service, however, I designed it to colelct telemetry data from my SonOff POW devices. This service can add static values (like the source/meaning of the data; e.g. ‘bojler_enabled’) and can remap keys (e.g. current power consumption data comes as ‘current’ but stored in DB as ‘value’).
Example configuration:
In the below configuration ‘test’ is the name of the table, ‘Time’ is a key comes from the MQTT message what will be renamed to ‘timestamp’ when service insert the data intothe table. If a message key isn’t named here it won’t be inserted into the database even it is in the message.
‘description’ is a column name in the database table and ‘heater_power’ is a constant to make filtering possible later on by SQL querys. You can add zero or more from these.
[defaults]
hostname  = 'localhost'
port      = 1883
loglevel  = DEBUG

launch   = mysql_remap

#functions = 'funcs.py'

[config:mysql_remap]
host  =  'localhost'
port  =  3306
user  =  'root'
pass  =  '123'
dbname  =  'test'
targets = {
         't1'   : [ 'test',
                            {
                              'Time': 'timestamp',
                              'Power': 'value'
                            },
                            {
                              'description' : 'heater_power'
                            }
                  ]
         }

[tele/+/SENSOR]
targets = mysql_remap:t1
#alldata = powerBinFunc()
You can also do some further transformation on the message before insert it into the database using by the two uncommented lines above and the below function (need to copy it into funcs.py).
This below example convert reveived data and time information itno unix timestam format and replace “ON” and “OFF” values to 1 and 0 numbers.
# -*- coding: utf-8 -*-
import time
import copy
import ast
from datetime import datetime

def powerBinFunc(topic, data, srv=None):
    # parse json payload (the message)
    payload = ast.literal_eval(data["payload"])

    # Override default time format
    dt = datetime.strptime(payload["Time"], '%Y-%m-%dT%H:%M:%S')
    ts = time.mktime(dt.timetuple())
    ret = dict( payload = dict( Time = ts ))

    # Check power state key
    if "POWER" in payload:
        if payload["POWER"] == "ON":
            ret["POWER_BIN"] = 1
        else:
            ret["POWER_BIN"] = 0

    return ret

# vim: tabstop=4 expandtab
Example MQTT message:
17:08:45 MQT: tele/bojler/SENSOR = {"Time":"2018-04-15T17:08:45","ENERGY":{"Total":320.144,"Yesterday":5.105,"Today":1.881,"Period":0,"Power":17.15,"Factor":0.07,"Voltage":234,"Current":0.128}}
Example MySQL records:
+------------+-----------+----------------+
| timestamp  | value     | description    |
+------------+-----------+----------------+
| 1523804925 |  17.15000 | heater_power   |
+------------+-----------+----------------+
mythtv
This service allows for on-screen notification pop-ups on MythTV instances.
Each target address descriptor requires the address and port of the MythTV
backend instance (<hostname>:<port>), and a broadcast address.
[config:mythtv]
timeout = 10  # duration of notification
targets = {
                          # host:port             broadcast address
    'all'               :  [ '192.168.1.40:6544', '192.168.1.255'],
    'frontend_bedroom'  :  [ '192.168.1.40:6544', '192.168.1.74' ]
    }
Topic option |
M/O |
Description |
|---|---|---|
|
O |
notification title (default: |
|
O |
notification image URL |
nntp
The nntp service is used to post articles to an NNTP news server on a particular newsgroup.
[config:nntp]
server  = t1.prox
port    = 119
; username = "jane@example.com"
; password = "secret"
targets = {
    #            from_hdr                        newsgroup
    'aa'     : [ 'Me and I <jj@example.com>',    'jp.aa' ],
  }
Each target’s configuration includes the value given to the From: header as well as
a single newsgroup to which the article is posted.
Topic option |
M/O |
Description |
|---|---|---|
|
O |
The post’s subject (default: |
Example
Publishing a message to MQTT…
mosquitto_pub -t nn/ohoh -m '{"name": "Jane Jolie", "number": 47, "id": 91}'
…turns into:
Path: t1.prox!t1.prox!not-for-mail
Content-Type: text/plain; charset="us-ascii"
MIME-Version: 1.0
Content-Transfer-Encoding: 7bit
From: Me and I <jj@example.com>
Subject: Hi there Jane Jolie
Newsgroups: jp.aa
Date: Wed, 26 Mar 2014 22:41:25 -0000
User-Agent: mqttwarn
Lines: 1
Message-ID: <5332caf6$0$20197$41d98655@t1.prox>

Jane Jolie: 47 => 13:41
nsca
The nsca service is used to submit passive Nagios/Icinga checks to an NSCA daemon.
NSCA is a Linux/Unix daemon allows you to integrate passive alerts and checks from
remote machines and applications with Nagios.
Example
Consider the following Icinga service description which configures a passive service.
define service {
        use                    generic-service
        host_name              localhost
        service_description    Current temp via MQTT
        active_checks_enabled  0
        passive_checks_enabled 1
        check_freshness        0
        check_command          check_dummy!1
        }
with the following target definition in mqttwarn.ini.
[config:nsca]
nsca_host = '172.16.153.112'
targets = {
   #              Nagios hostname       Nagios service description
   'temp'    :  [ 'localhost',          'Current temp via MQTT' ],
  }

[arduino/temp]
targets = nsca:temp
; OK = 0, WARNING = 1, CRITICAL = 2, UNKNOWN = 3
priority = check_temperature()
format = Current temperature: {temp}C
The transformation function assigned by priority = check_temperature() computes
the status to be submitted to Nagios/Icinga. It has been defined like this within
udf.py.
from pynsca import OK, WARNING, CRITICAL, UNKNOWN

def check_temperature(data):
    """
    Compute Nagios/Icinga warning status, depending on the temperature value.
    """
    OK = 0
    WARNING = 1
    CRITICAL = 2
    UNKNOWN = 3
    if type(data) == dict:
        if 'temp' in data:
            temp = int(data['temp'])
            if temp < 20:
                return OK
            if temp < 25:
                return WARNING
            return CRITICAL

    return UNKNOWN
Now, when publishing a message to MQTT,
mosquitto_pub -t arduino/temp -m '{"temp": 20}'
… a corresponding monitoring event has been produced.

Topic option |
M/O |
Description |
|---|---|---|
|
O |
Nagios/Icinga status. (default: 0) |
Requirements
ntfy
ntfy (pronounce: notify) is a simple HTTP-based pub-sub notification service. It allows you to send notifications to your phone or desktop via scripts from any computer, entirely without signup, cost or setup. ntfy is also open source, if you want to run an instance on your own premises.
ntfy uses topics to address communication channels. This topic is part of the HTTP API URL.
To use the hosted variant on ntfy.sh, just provide an URL including the topic.
[config:ntfy]
targets  = {
    'test': 'https://ntfy.sh/testdrive',
    }
When running your own instance, you would use a custom URL here.
[config:ntfy]
targets  = {
    'test': 'http://username:password@localhost:5555/testdrive',
    }
In order to specify more options, please wrap your ntfy URL into a dictionary
under the url key. This way, additional options can be added.
[config:ntfy]
targets  = {
    'test': {
        'url': 'https://ntfy.sh/testdrive',
        },
    }
Note
ntfy publishing options outlines different ways to marshal data to the ntfy HTTP API. mqttwarn utilizes two variants to submit the notification to ntfy, using both the HTTP PUT and POST methods, and encoding ntfy option fields into HTTP headers with RFC 2047 MIME quoted-printable encoding.
Per default, send the message as HTTP body, enabling line breaks.
When submitting a local attachment without a text message, encode the attachment data into the HTTP body, and all other fields into HTTP headers.
When it is a notification with both a local attachment, and a text message, also encode the attachment data into the HTTP body, but replace all newline characters
\nof the text message, because they can not be encoded into HTTP headers.
Effectively, this means you can not submit notification message texts including newline characters and local attachments at the same time. When adding a local attachment, all newline characters will implicitly be replaced by space characters.
Remote attachments
In order to submit notifications with an attachment file at a remote location,
use the attach field. Optionally, the filename field can be used to assign
a different name to the file.
[config:ntfy]
targets  = {
    'test': {
        'url': 'https://ntfy.sh/testdrive',
        'attach': 'https://unsplash.com/photos/spdQ1dVuIHw/download?w=320',
        'filename': 'goat.jpg',
        },
    }
Local attachments
By using the attachment option, you can add an attachment to your message, local
to the machine mqttwarn is running on. The file will be uploaded when submitting
the notification, and ntfy will serve it for clients so that you don’t have to. In
order to address the file, you can provide a path template, where the transformation
data will also get interpolated into.
[config:ntfy]
targets  = {
    'test': {
        'url': 'https://ntfy.sh/testdrive',
        'file': '/tmp/ntfy-attachment-{slot}-{label}.png',
        }
    }
Important
In order to allow users to upload and attach files to notifications, you will
need to enable the corresponding ntfy feature by simply configuring an attachment
cache directory and a base URL (attachment-cache-dir, base-url), see
ntfy stored attachments.
Note
When mqttwarn processes a message, and accessing the file raises an error, it gets handled gracefully. In this way, notifications will be triggered even when attaching the file fails for whatever reasons.
Publishing options
You can use all the available ntfy publishing options, by using the corresponding
option names listed within NTFY_FIELD_NAMES, which are: message, title, tags,
priority, actions, click, attach, filename, delay, icon, email,
cache, firebase, and unifiedpush. See also the list of all ntfy option fields.
You can obtain ntfy option fields from three contexts in total, as implemented
by the obtain_ntfy_fields function. Effectively, that means that you can place
them either within the targets address descriptor, within the configuration
section, or submit them using a JSON MQTT message and a corresponding decoder
function into the transformation data dictionary.
For example, you can always send a priority field using MQTT/JSON, or use one of
those configuration snippets, which are equivalent.
[config:ntfy]
targets  = {
    'test': {
        'url': 'https://ntfy.sh/testdrive',
        'priority': 'high',
        }
    }
[config:ntfy]
targets  = {
    'test': {
        'url': 'https://ntfy.sh/testdrive',
        }
    }
priority = high
The highest precedence takes data coming in from the transformation data dictionary,
followed by option fields coming in from the per-recipient targets address descriptor,
followed by option fields defined on the [config:ntfy] configuration section.
Examples
This is another way to write the “remote attachments” example, where all ntfy options are located on the configuration section, so they will apply for all configured target addresses.
[config:ntfy]
targets  = {'test': 'https://ntfy.sh/testdrive'}
attach   = https://unsplash.com/photos/spdQ1dVuIHw/download?w=320
filename = goat.jpg
The tutorial Frigate » Forward events and snapshots to ntfy explains how to configure mqttwarn to notify the user with events emitted by Frigate, a network video recorder (NVR) with realtime local object detection for IP cameras.
osxsay
The osxsay service alerts you on your macOS system with a spoken voice, using
the say utility. You can configure any number of different targets, each with
a different voice. See say -v ? for a list of allowed voice names.
[config:osxsay]
targets = {
                 # voice (see `man say or `say -v ?`)
    'victoria' : [ 'Victoria' ],
    'alex'     : [ 'Alex' ],
  }

[say/warn]
targets = osxsay:victoria

[say/alert]
targets = osxsay:alex
Note
Your speakers need to be enabled, and it can be a pain for your co-workers or family members. Also, we can’t show you a screenshot.
pastebinpub
The pastebinpub service is publishing messages to Pastebin, using the
Pastebin API package.
[config:pastebinpub]
targets = {
    'warn': [ 'api_dev_key',  # API dev key
              'username',     # Username
              'password',     # Password
              1,             # Privacy level
              '1H'            # Expiration
            ]
    }

Note
If you are not a paying customer of Pastebin, you are limited to 25 unlisted and 10 private pastes.
Attention
Be careful what you post on this target, it could be public.
pipe
The pipe target launches the specified program and its arguments and pipes the
outbound message from mqttwarn into the program’s stdin channel. If the message
does not have a trailing newline (\n), mqttwarn appends one.
[config:pipe]
targets = {
         # argv0 ...
   'wc': [ 'wc', '-l' ]
   }
Warning
For each message processed by the pipe service, a new process is spawned (fork/exec),
so this service plugin is more expensive than other pure-Python ones.
postgres
The postgres plugin behaves virtually identically to the MySQL plugin above. It is configured in the same way:
[config:postgres]
host  =  'localhost'
port  =  5432
user  =  'jane'
pass  =  'secret'
dbname  =  'test'
targets = {
          # tablename  # fallbackcolumn  # schema
 'pg'   : [ 'names',   'message',	 'schema' ]
  }
Suppose we create the following table for the target specified above:
CREATE TABLE names (id INTEGER, name CHARACTER VARYING(128));
and publish this JSON payload:
mosquitto_pub -t pg/1 -m '{ "name" : "Jane Jolie", "id" : 90, "number" : 17 }'
This will result in the two columns id and name being populated:
+------+------------+
| id   | name       |
+------+------------+
|   90 | Jane Jolie |
+------+------------+
Exactly as in the MySQL plugin, a fallback column can be defined into which mqttwarn adds
the “rest of” the payload for all columns not targeted with JSON data. Lets now
add our fallback column to the schema:
ALTER TABLE names ADD message TEXT;
Publishing the same payload again, will insert this row into the table:
+------+------------+-----------------------------------------------------+
| id   | name       | message                                             |
+------+------------+-----------------------------------------------------+
|   90 | Jane Jolie | NULL                                                |
|   90 | Jane Jolie | { "name" : "Jane Jolie", "id" : 90, "number" : 17 } |
+------+------------+-----------------------------------------------------+
As you can imagine, if we add a number column to the table, it too will be
correctly populated with the value 17.
The payload of messages which do not contain valid JSON will be coped verbatim to the fallback column:
+------+------+-------------+--------+
| id   | name | message     | number |
+------+------+-------------+--------+
| NULL | NULL | I love MQTT |   NULL |
+------+------+-------------+--------+
You can add columns with the names of the built-in transformation types (e.g. _dthhmmss, see below)
to have those values stored automatically.
prowl
This service is for Prowl, based on pyprowl. Each target requires an application key and an application name.
[config:prowl]
targets = {
                 # application key                           # app name
    'pjpm'    :  [ 'xxxxxxxxxxxxxxxxxxxxxxxxxxxxxxxxxxxxxxxx', 'SuperAPP' ]
    }
Topic option |
M/O |
Description |
|---|---|---|
|
O |
application title (default: |
|
O |
priority. (default: 0) |

pushbullet
This service is for Pushbullet, an app for Android along with an extension for Chrome and Firefox, which allows notes, links, pictures, addresses and files to be sent between devices.
You can get your API key from the Pushbullet account page after signing up, see also Pushbullet » Getting an access token.
You will also need the device ID to push the notifications to. To obtain this, you can, for example, follow the instructions at pyPushBullet, by running
./pushbullet_cmd.py YOUR_API_KEY_HERE getdevices
The configuration layout looks like this.
[config:pushbullet]
targets = {
    "warnme"   : {
        "access_token": "a6FJVAA0LVJKrT8k",
        "recipient": "test@example.org",
        "recipient_type": "email",
        },
    "alertme"   : {
        "access_token": "a6FJVAA0LVJKrT8k",
        "recipient": "ujpah72o0sjAoRtnM0jc",
        },
    }
The optional recipient_type could be one of device (default), email, channel
or client. See also Pushbullet target parameters.
Topic option |
M/O |
Description |
|---|---|---|
|
O |
application title (default: |

Note
The client currently only implements sending message with type=note. If you have a
need to submit files or links, please let us know on the mqttwarn issue tracker.
pushover
This service is for Pushover, an app for iOS and Android.
In order to receive pushover notifications, you need what is called a user key and one or more application keys, which you configure within the target address descriptor definition.
[config:pushover]
callback = None
targets = {
    'nagios'     : ['userkey1', 'appkey1', 'sound1'],
    'alerts'     : ['userkey2', 'appkey2'],
    'tracking'   : ['userkey1', 'appkey2', None, 'cellphone1,cellphone2'],
    'extraphone' : ['userkey2', 'appkey3']
    }
This defines four targets (nagios, alerts, etc.), which are directed to the
configured user key and app key combinations. This in turn enables you to
notify, say, one or more of your devices as well as one for your spouse. As you
can see in the example, you can even specify an optional sound to be played for
the individual users. For a list of available sounds see the list of Pushover
sounds.
You can also specify the devices that should be notified, this is a comma-separated
list of device names specified as a single string. If you want to specify custom
devices, but don’t want to specify a custom sound, you have to pass None for the
sound.
Topic option |
M/O |
Description |
|---|---|---|
|
O |
application title (default: pushover default) |
|
O |
priority. (default: pushover setting) |
Users can enable the Pushover HTML/Message Styling or Pushover Supplementary URLs
support options in messages, by adding the html, url, and url_title keys to the
data object. callback is an optional URL to acknowledge Pushover messages.
[config:pushover]
callback = None
alldata = PushoverAllData()
def PushoverAllData(topic, data, srv=None):
	return {
		'url': 'https://somedomain/path',
	}
The pushover service will accept a payload with either a simple text message, or a
JSON payload which contains a message and either an imageurl or imagebase64
encoded image.
The default values for PushOver’s API expire and retry settings can be adjusted
either by setting the api_expire / api_retry keys in the config section, or via
the PUSHOVER_API_RETRY / PUSHOVER_API_EXPIRE environmental variables.
The configuration settings will take precedence over environmental variables.
The default values are 60 and 3600 respectively. These settings can further be adjusted
on a per-message basis by setting the expire and retry keys in the data object.
[config:pushover]
callback = None
api_expire = 30
api_retry = 1800
alldata = PushoverAllData()
def PushoverAllData(topic, data, srv=None):
	return {
		'expire': 120,
		'retry': 3600,
	}
Further, the imageurl payload can have the additional parameters of an auth type (basic, digest) and a user and password. This is useful if your imaging device uses authentication. For example, some IP cameras, or some other simple internet based image services.
The following payloads are valid examples.
Simple text message
{
    "message": "Message only, with no image"
}
{
    "message": "Message with base64 encoded image",
    "imagebase64": "<base64 encoded image>"
}
{
    "message": "Message with image downloaded from URL",
    "imageurl": "<image url>"
}
{
    "message": "Message with image downloaded from URL: digest authentication",
    "imageurl": "<image url>",
    "auth": "digest",
    "user": "myspecialuser",
    "password": "myspecialpassword"
}
For the above example, we recommend this to be used in a local MQTT environment only, because the password for your imaging device is being transmitted in clear-text to mqttwarn.
pushsafer
Pushsafer is an app for iOS, Android and Windows 10. You can define different notification targets, in turn dispatching to one or multiple Pushsafer devices or groups. For a list of available icons, sounds and other parameters, see the Pushsafer API documentation.
Requirements
In order to receive Pushsafer notifications, you need what is called a private or alias key. To receive such a key, you will need to sign up for an account.
Configuration example
[config:pushsafer]
; https://www.pushsafer.com/en/pushapi
; https://www.pushsafer.com/en/pushapi_ext
targets = {
    'basic': { 'private_key': '3SAz1a2iTYsh19eXIMiO' },
    'nagios': {
        'private_key': '3SAz1a2iTYsh19eXIMiO',
        'device': '52|65|78',
        'icon': 64,
        'sound': 2,
        'vibration': 1,
        'url': 'http://example.org',
        'url_title': 'Example Org',
        'time_to_live': 60,
        'priority': 2,
        'retry': 60,
        'expire': 600,
        'answer': 1,
        'answeroptions': 'yes|no|maybe',
        'answerforce': 1,
        'confirm': 10,
        },
    'tracking': {
        'private_key': '3SAz1a2iTYsh19eXIMiO',
        'device': 'gs23',
        'icon': 18,
        },
    'extraphone': { 'private_key': 'aliaskey2', 'time_to_live': 60, 'priority': 2, 'retry': 60, 'expire': 600, 'answer': 0 },
    'warnme': { 'private_key': 'aliaskey3', 'time_to_live': 60, 'priority': 1, 'answer': 1, 'answerforce': 1, 'confirm': 10 },
    }
MQTT topic options
Topic option |
M/O |
Description |
|---|---|---|
|
O |
application title (dflt: pushsafer dflt) |
Screenshot
redispub
The redispub plugin publishes to a Redis channel, using the redis-py
package.
[config:redispub]
host  =  'localhost'
port  =  6379
targets = {
    'r1'      : [ 'channel-1' ]
    }
rrdtool
The rrdtool plugin updates a round-robin database created by rrdtool with
the message payload, using the Python rrdtool bindings.
[config:rrdtool]
targets = {
    'living-temp'  : ['/tmp/living-temp.rrd',  '--template', 'temp'],
    'kitchen-temp' : ['/tmp/kitchen-temp.rrd', '--template', 'temp']
    }
rrdpython’s API expects strings and/or a list of strings as parameters to the functions.
Thus, a list for a target simply contains the command line arguments for rrdtool update.
The plugin will embed the message as final argument N:<message>, if the message is an
integer number. Otherwise, it will break up the message into single words and append this
list to the list supplied by the target. This leaves it to your discretion where to put
arguments and even - with the right data mapping and extraction in place - allows for
a configuration like:
[config:rrdtool]
targets = {
        'battsensor': [ ],
        }
...
[datalog-battery-log]
topic = datalog/sensors/batt/+
targets = log:info,rrdtool:battsensor
datamap = ...
format = /srv/rrd/sensors/{sensor_id}.rrd -t batt {ts}:{batt}
serial
The serial plugin sends out received messages to the serial port. Message payload can be binary data, string or json.
[config:serial]
append_newline = False
targets = {
    'serialport1'  : ['/dev/ttyUSB0',  '115200'],
    'some-device' : ['socket://192.168.1.100:2323', '9600']
    }
First parameter in target config can be a portname or an url handler.
Second parameter is the baudrate for the port.
If append_newline is True, a newline character is unconditionally appended to the string written to the serialport.
Requires the pyserial bindings available with pip install pyserial.
slack
The slack plugin posts messages to channels in or users of the slack.com
service, using the Python Slack SDK. The configuration of this service
requires an API token.
[config:slack]
token = 'xxxx-1234567890-1234567890-1234567890-1234a1'
targets = {
                #   [token,] #channel/@user, username, icon, [as_user]
   'jpmens'     : [ '@jpmens',   "Alerter",   ':door:'          ],
   'general'    : [ '#general',  "mqttwarn",  ':syringe:'       ],
   'test'       : [ '#test',     "BotUser",   ':unused:',  True ],
   'second-acc' : [ 'xxxx-9999999-9999999-99999999', '#general', "test", ':house:' ],
  }
The service level token is optional, but if missing, each target must have a
token defined.
Each target defines the name of an existing channel (#channelname), or a user
(@username), to be addressed, the name of the sending user, as well as an
optional emoji icon to use.
Also, optionally, a target can define the message to get posted as a user, per Slack message authorship. Note that posting as a user in a channel is only possible, if the user has already joined the channel.
The slack service will accept a payload with either a simple text message, or a
JSON payload, which contains a message and either an imageurl or imagebase64
encoded image.
Further, the imageurl payload can have the additional parameters of an auth type
(basic, digest), and a user and password. This is useful if your imaging device
uses authentication, for example some IP cameras, or some other simple internet
based image services.
The following messages are valid payloads.
Simple text message
{
    "message": "Message only, with no image"
}
 {
    "message": "Message with base64 encoded image",
    "imagebase64": "<base64 encoded image>"
 }
 {
    "message": "Message with image downloaded from URL",
    "imageurl": "<image url>"
 }
 {
    "message": "Message with image downloaded from URL: digest authentication",
    "imageurl": "<image url>",
    "auth": "digest",
    "user": "myspecialuser",
    "password": "myspecialpassword"
 }
For the above example, we only recommend this be used on a local MQTT server instance, because the password for your imaging device is being transmitted in clear-text to mqttwarn.
smtp
The smtp service effectively implements an MQTT to SMTP gateway.
[config:smtp]
server  =  'localhost:25'
sender  =  "MQTTwarn <jpm@localhost>"
username  =  None
password  =  None
starttls  =  False
# Optional send msg as html or only plain text
htmlmsg   =  False
targets = {
    'localj'     : [ 'jpm@localhost' ],
    'special'    : [ 'ben@gmail', 'suzie@example.net' ]
    }
Targets may contain more than one recipient, in which case all specified recipients will get the message.
Topic option |
M/O |
Description |
|---|---|---|
|
O |
e-mail subject. (default: |
sqlite
The sqlite plugin creates a table in the database file specified in the target address
descriptor, and creates a schema with a single column called payload of type TEXT.
mqttwarn will write and commit messages into this table correspondingly.
[config:sqlite]
targets = {
                   #path        #tablename
  'demotable' : [ '/tmp/m.db',  'mqttwarn'  ]
  }
sqlite_json2cols
The sqlite_json2cols plugin creates a table in the database file specified in the target
address descriptor, and creates a schema based on the JSON payload. It will create a column
for each JSON field and rudimentary try to determine its datatype on creation (float or
char). If the table already exists, no table will be created.
[config:sqlite_json2cols]
targets = {
                   #path        #tablename
  'demotable' : [ '/tmp/m.db',  'mqttwarn'  ]
  }
As an example, let’s publish a JSON payload.
mosquitto_pub -t test/hello -m '{ "name": "Thor", "Father": "Odin", "Age": 30 }'
When mqttwarn receives that message, it will create a database table with the following structure and content.
+------+--------+------+
| name | Father | Age  |
+------+--------+------+
| Thor | Odin   | 30.0 |
+------+--------+------+
sqlite_timestamp
The sqlite_timestamp plugin works just like the sqlite plugin, but it creates three
columns: id, payload and timestamp. The id is the table index, and the timestamp
is the record insertion date and time in seconds.
[config:sqlite_timestamp]
targets = {
                   #path        #tablename
  'demotable' : [ '/tmp/m.db',  'mqttwarn'  ]
  }
ssh
The ssh service can run commands over SSH. Target address descriptors may contain
exactly one command.
[config:ssh]
host  = '192.168.1.1'
port  = 22
user  = 'username'
pass  = 'password'
targets = {
		's01'    : [ 'command with one substitution %s' ],
		's02'    : [ 'command with two substitutions %s__%s' ]
    }

[ssh/+]
format = {args}
targets = ssh:s01

[dualssh/+]
format = {args}
targets = ssh:s02
mosquitto_pub -t dualssh/test -m '{ "args": ["test", "test2"] }'
Authentication
If both username and password are defined in the mqttwarn configuration, they will be used
to connect to the host. If both user and password are not defined in the configuration,
the service will parse the user’s SSH config file to see which key (IdentityFile) to use.
It will also use User and Port options from this file.
When using a key, only the host name is required. The output is ignored for now.
Attention
Using this module lets you specify a username and a password which can be used to log in to
the target system. As such, your mqttwarn.ini configuration file should be well protected
from prying eyes! Of course, this applies in general, for other target specifications with
credentials as well.
Todo
How to configure keys?
syslog
The syslog service transfers MQTT messages to a local syslog server. Example output:
Apr 22 12:42:42 mqttest019 mqttwarn[9484]: Disk utilization: 94%
[config:syslog]
targets = {
              # facility    priority,  option
    'user'   : ['user',     'debug',  'pid'],
    'kernel' : ['kernel',   'warn',   'pid']
    }
Topic option |
M/O |
Description |
|---|---|---|
|
O |
application title (default: |
|
O |
log level (default: -1) |
The value of the priority field can be between -2 and 5, and maps to corresponding
syslog levels, according to this table.
Priority |
Syslog Log Level |
|---|---|
-2 |
LOG_DEBUG |
-1 |
LOG_INFO |
0 |
LOG_NOTICE |
1 |
LOG_WARNING |
2 |
LOG_ERR |
3 |
LOG_CRIT |
4 |
LOG_ALERT |
5 |
LOG_EMERG |
telegram
This service plugin submits messages as a Bot to a Telegram chat. In order to configure it properly, you will need to set up a Bot and obtain its authentication token which you add to mqttwarn’s configuration. You will also need to start a chat with this Bot, so it is able to communicate with a particular user.
Optionally, you can specify parse_mode, which will be used during message sending. Please
check the Telegram formatting options for additional information.
[config:telegram]
timeout = 60
parse_mode = 'Markdown'
token = 'mmmmmmmmm:AAAAAAAAAAAAAAAAAAAAAAAAAAAAAAAAAAA'
targets = {
   #        First Name or @username or #chat_id
   'j01' : [ 'First Name' ],
   'j02' : [ '@username' ],
   'j03' : [ '#chat_id' ]
    }
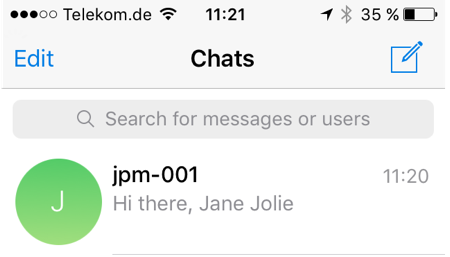
Attention
There is a possible issue: When First name, or @username was specified as recipient, the
plugin will call the Telegram “getUpdates” API, in order to retrieve the chat_id, but this
call returns just the most recent 100 messages. So, if you haven’t spoken to your Bot recently,
it may well be possible mqttwarn can’t find the chat_id associated with you. If the
chat_id is known, it can be set as a recipient using the # prefix.
Using chat_id
If you know the chat_id, you can specify the telegram service to use that chat_id directly.
If you configure the service plugin this way, please note that this mode will be used for all
the configured recipients.
The quickest way to get the chat_id, is by visiting this URL (insert your api key), and getting
the id from the “from” section: https://api.telegram.org/botYOUR_API_TOKEN/getUpdates
[config:telegram]
timeout = 60
parse_mode = 'Markdown'
token = 'mmmmmmmmm:AAAAAAAAAAAAAAAAAAAAAAAAAAAAAAAAAAA'
use_chat_id = True
targets = {
    #       chat_id (in quotes)
    'j01' : ['123456789']
    }
thingspeak
The thingspeak service publishes data to the ThingSpeak platform, using its HTTP API,
see ThingSpeak “Write Data” API.
[config:thingspeak]
targets = {
                   #API WRITE KEY       field      optional builddata=true/false
    'field1'   : [ 'XXYYZZXXYYZZXXYY', 'field1' , 'true' ],
    'field2'   : [ 'XXYYZZXXYYZZXXYY', 'field2' ],
    'composite': [ 'XXYYZZXXYYZZXXYY', [ 'temp', 'hum' ] ]
  }
Using builddata=true, you can build an update with multiple fields in one update. When
using this function, no direct update is performed. Only with the next update, without
builddata=true, all entries are sent. For example, when multiple sensors are updating
different topics, you can buffer/record the data, and submit it when data has been received
from the last sensor subscription.
Supply an ordered list of message data field names to extract several values from a single
message, for example { "temp": 10, "hum": 77 }. Values will be assigned to the venerable
ThingSpeak field1, field2, … telemetry fields, in order of decoding.
Note
Make sure to define the field name like in the example shown above, using 'field1':
It should be defined as string, lower case, with the last digit being the field number.
tootpaste
The tootpaste service is for posting to the Mastodon social network, based on the
Mastodon.py Python wrapper.
pip install 'mqttwarn[tootpaste]'
[config:tootpaste]
targets = {
             # client credentials,       user credentials,      base_url
    'uno'  : [ '/path/to/client.creds',  '/path/to/user.creds', 'https://masto.io' ],
  }
Note
The specified client credentials and user credentials options are paths to files created with the command presented in the next section.
Warning
The credentials files should be protected from prying eyes.
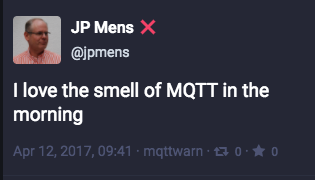
Configure authentication
In order to configure the plugin properly, you will need to obtain both client/application credentials, and a user authorization token. Mastodon » Logging in with an account is the canonical documentation, and How to get credentials for the Mastodon API with Mastodon.py also outlines corresponding step-by-step instructions.
mqttwarn’s tootpaste service plugin ships with an implementation for that authorization
process, which boils down the instructions to invoking a single command.
#   baseurl            email              password      client   client credentials    user credentials
python -m mqttwarn.services.tootpaste \
    'https://masto.io' 'jane@example.org' 'xafa5280890' mqttwarn /path/to/client.creds /path/to/user.creds
The arguments are, in order:
base URL (e.g.
https://mastodon.social)your e-mail address
the password corresponding to the e-mail address
the client name (name of the posting program)
path to the file storing the client credentials
path to the file storing the user credentials
twilio
The twilio service submits messages to the Twilio API, using the twilio-python package.
[config:twilio]
targets = {
             # Account SID            Auth Token            from              to
   'hola'  : [ 'ACXXXXXXXXXXXXXXXXX', 'YYYYYYYYYYYYYYYYYY', "+15105551234",  "+12125551234" ]
   }

twitter
Note it is highly unlikely that this will work again; twitter’s no longer what it was before it was shredded.
The twitter service plugin submits notification events to the Twitter platform,
using the python-twitter API wrapper package.
It will need you to set up a Twitter Developer App, in order to generate and obtain four credential values:
API Key and Secret (also known as Consumer Key and Secret)
Access Token and Secret
Upon configuring this service’s targets, make sure the four (4) elements of the list are in the order specified!
[config:twitter]
targets = {
  'janejol'   :  [ 'vvvvvvvvvvvvvvvvvvvvvv',                              # api_key
                   'wwwwwwwwwwwwwwwwwwwwwwwwwwwwwwwwwwwwwwwwww',          # api_secret
                   'xxxxxxxxxxxxxxxxxxxxxxxxxxxxxxxxxxxxxxxxxxxxxxxxxx',  # access_token_key
                   'zzzzzzzzzzzzzzzzzzzzzzzzzzzzzzzzzzzzzzzzzz'           # access_token_secret
                  ]
   }
Note
Please make sure the four credential values are specified in the correct order.
Todo
This is a perfect candidate to use [named target address descriptor options] instead. [named target address descriptor options]: https://github.com/mqtt-tools/mqttwarn/issues/628
websocket
The websocket service can be used to send data to a websocket endpoint defined by its URI,
using the websocket-client Python package. Both ws:// or wss:// URI schemas are supported.
[config:websocket]
targets = {
        # targetid      wsuri
        'wssserver' : [ 'ws://localhost/ws' ],
}
xbmc
The xbmc service plugin invokes on-screen notification pop-ups on Kodi (formerly XBMC)
instances. For each target, you will need to configure the address and port of the Kodi instance
(<hostname>:<port>), and an optional username and password, when authentication is required.
[config:xbmc]
targets = {
                          # host:port,           user    password
    'bedroom_no_auth'  :  [ '192.168.1.41:8080' ],
    'living_with_auth' :  [ '192.168.1.40:8080', 'xbmc', 'xbmc' ]
    }

Topic option |
M/O |
Description |
|---|---|---|
|
O |
notification title |
|
O |
notification image URL (example) |
xmpp
The xmpp service sends notifications to one or more XMPP (Jabber) recipients,
using the xmpppy Python package.
[config:xmpp]
sender = 'mqttwarn@jabber.server'
password = '<password>'
targets = {
    'admin' : [ 'admin1@jabber.server' ],
    'sig'   : [ 'user1@jabber.server', 'user2@jabber.server' ]
    }
slixmpp
The slixmpp service sends notification to one or more XMPP (Jabber) recipients.
[config:slixmpp]
sender = 'mqttwarn@jabber.server'
password = 'Password for sender'
targets = {
    'admin' : [ 'admin1@jabber.server', 'admin2@jabber.server' ]
    }
Targets may contain more than one recipient, in which case all specified recipients get the message.
Requires:
XMPP (Jabber) accounts (at least one for the sender and one for the recipient)
zabbix
As an introduction, the blog post Zabbix meets MQTT explains a bit of the background,
and which thought process went into integrating Zabbix with MQTT and mqttwarn. Following
this rationale, the zabbix service plugin implements two things.
Create a Zabbix host on the fly, via Zabbix low-level discovery (LLD).
Send a metric item/value pair to a Zabbix trapper.
To create an appropriate discovery host, in Zabbix:
Configuration->Hosts->Create host (
mqttwarn01)Configuration->Discovery->Create discovery rule
Name:
MQTTwarn(any suitable name)Type:
Zabbix trapperKey:
mqtt.discovery(this must match the configureddiscovery_key, which defaults tomqtt.discovery)Allowed hosts:
192.168.1.130,127.0.0.1(example)
The target and topic configuration look like this:
[config:zabbix]
host = "mqttwarn01"  # an existing host configured in Zabbix
discovery_key = "mqtt.discovery"
targets = {
            # Trapper address   port
    't1'  : [ '172.16.153.110', 10051 ],
  }

[zabbix/clients/+]
alldata = ZabbixData()
targets = zabbix:t1

[zabbix/item/#]
alldata = ZabbixData()
targets = zabbix:t1
A transformation function in alldata is required to extract the client’s name
from the topic, and for #1, to define a “host alive” item key in Zabbix.
# If the topic begins with zabbix/clients we have a host going up or down
# e.g. "zabbix/clients/jog03" -> "jog03"
#   extract client name (3rd part of topic)
#   set status key (e.g. 'host.up') to publish 1/0 on it (e.g during LWT)
#
# if the topic starts with zabbix/item we have an item/value for the host
# e.g. "zabbix/item/jog03/time.stamp" -> "jog03"
#   extract client name (3rd part of topic)
#

def ZabbixData(topic, data, srv=None):
    client = 'unknown'
    key = None
    status_key = None

    parts = topic.split('/')

    ''' What we call 'client' is in fact a "Zabbix Host", i.e. the name of a
        host configured with items; it it not the name/address of the machine on
        which Zabbix server runs. So, in the UI: Configuration -> Create host '''

    client = parts[2]

    if topic.startswith('zabbix/clients/'):
        status_key = 'host.up'

    ''' This "key" is actually an LLD item which we've pre-created in the Zabbix
        UI. Configuration->Hosts->Discovery->Item prototypes->Create item prototype
	   Name: MW client $1
	   Type: Zabbix trapper
	   Key: mqttwarn.id[{#MQTTHOST}]
	   Type: text (can be any suitable type)

	Publishing a value with
	$ mosquitto_pub -t zabbix/item/mqttwarn01/mqttwarn.id[m02] -m 'stormy'
	will mean that we'll use the client "mqttwarn01" (see previously) and
	the item named "mqttwarn.id[m02]" which is the name of a previously
	discovered item.
    '''

    if topic.startswith('zabbix/item/'):
        key = parts[3]

    return dict(client=client, key=key, status_key=status_key)
For another scenario using the zabbix plugin, please refer to the Zabbix IoT example.